
Procedural Cornrows Study

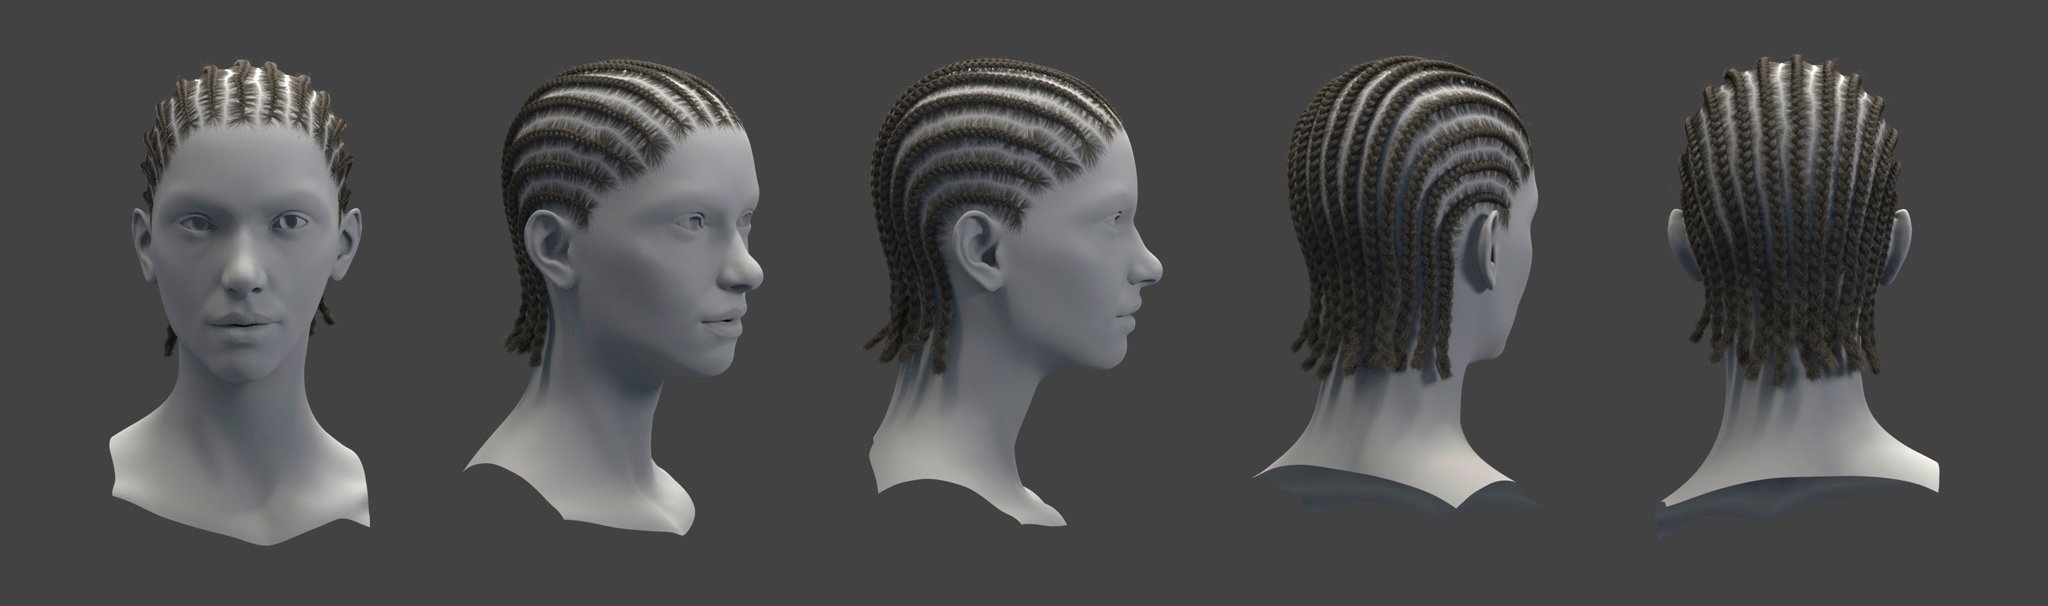
In this post, I'll explain my process of creating procedural cornrows setup in Houdini. I wanted to do a project to explore procedural braid workflows, including as much vex scripting as possible. I’ve built a library of vex scripts over the last fall which became handy putting this groom in place. My main focus was to create a setup that would generate braids and scalp hairs growing into the braid procedurally. Since I didn't focus on the hairline, the only real manual work I did was sculpting guide curves for the braids and painting a single density map for the scalp hairs.
Guide curves
I started with Houdini's draw curve node to get some curves directly on the skin. Then plugged the guides to the guide groom node to extend the tips towards the neck and shape them. Pretty straightforward guide work. To help the guide curves stick to the surface, I used this script in point wrangle with guides in the first input and skin in the second input.
vector oldpos = v@P;
float curveu = 1-chramp("curveu_ramp",@curveu);

int prim;
vector primuv;

float dist = xyzdist(1,@P,prim,primuv);
vector pos = primuv(1,"P",prim,primuv);

v@P = pos * curveu + oldpos * (1-curveu);
f@braid_blend = 1-curveu;
The script will look up the closest position on the skin surface and stick the guide points to this position. The script relies on the principle of finding attributes on a primitive with xyzdist() and primuv() vex functions. Using these two functions together is already well described in This Post on Toadstorm Nerdblog.
The script includes a parameter to ramp the influence of the sticking. Also, I write the value of this sticking parameter to an attribute to control some features afterward–Noises, etc. Once the guides were sticking to the surface, I could control the height of the guides by transferring normals from the skin and running this script in a point wrangle:
v@P += chf("push") * chramp("curveu_ramp",@curveu) * v@N;This script is similar to Houdini's peak node but includes a ramp to control the effect. Note that both scripts need the curveu attribute created with the resample node.
Creating the braid
For turning the guide into a braid, I used this setup described in the post: Braid From Curve. The idea to start the braid is to create an axis system on the points of the guide curve so the three threads of the braid can be displaced towards the right direction. In this case, the axis system consists of a normal vector transferred from the skin points, a tangentu vector created by the resample node, and a cross-product of these two vectors.
I used this Multiply Curve setup to generate hairs for the braids. The script has parameters to control the shape of the multiplied curves. To minimize intersections, I adjusted this to be a bit larger in width than height (looking at the skin's normal direction). Generating the hairs this way makes it easier to control the shape of the braid, but of course, it's not physically accurate. The hairs would grow from the skin in the real world, but I found that this will hold up pretty well if the render is not very close-up. Depending on the pipeline, generating hairs this way can be problematic. If it's needed for the hairs to have a root on the skin, this script will do the trick: Move Hair Roots To Surface. I know the braid is a hacky setup, but I'll explain how I simulated it in a later post.
To make the braids density thinner in the roots, I used this script that will randomly delete points from the roots of the primitives. This helped with blending the braid root to the scalp hairs.
int pts[] = primpoints(0,@primnum);

float cut = chi("cut") * rand(@primnum);
float probability = chf("probability");

for ( int i=0; i<len(pts); i++ ){
    if ( i < cut && probability < rand(@primnum) ){
        removepoint(0,pts[i]);
    }
}
At this point, I did some test renders, and the braids looked a bit flat. I wanted them to be fatter in the center, making the braid overall more rounded. I did this with a similar script to the one used to push the guides away from the skin. The only addition the script needs is to calculate a falloff value that makes the effect stronger on the center of the braid. This falloff value can be calculated with a xyzdist() vex function. I used this script in a point wrangle with braids in the first input and guides in the second input.
float dist = xyzdist(1,@P);
dist = fit(dist,0,0.5,1,0);
v@P += chf("amount") * v@N * dist;
Depending on the size of the braid, the fit values can be different. To roughly find the right value for this script I looked up the min and max values in the attribute spreadsheet. I could have found the min and max values dynamically to make the setup more future-proof including these lines in the script: Finding Minimum And Maximum Values of Attribute. Also, I wanted to blend this effect along the curves length. As I didn’t want to write the curveu ramp to every script I did, I used this simple mix script to blend between streams. This works by simply wiring the modified groom to the first input and original groom to the second input of a point wrangle. As long as the point order is the same, it will work. This is a script I use all the time for blending effects on grooms.
float blend = chramp("curveu_ramp",@curveu);
v@P = v@P * blend + @opinput1_P * (1-blend);
From here on, all work on the braid is just adjusting the noise and flyaways to get the wanted look. I used the Tangle Hairs By Scattered Points setup to create some tangles in the hairs to get a more dreadlock feeling on the braid ends.
Creating the scalp hairs
To make the scalp hairs look like cornrows, they would need to grow into the closest braid. For this, the hairs need a root point somewhere on the skin and a tip point sitting right on the sculpted braid guide. I started this setup by simply painting a density attribute marking the growing area and scattering points by this density. To initialize the hairs growing into the braid, I used this script in a point wrangle with scattered points to the first input and sculpted guides to the second input.
float dist;
int near_prim;
vector near_primuv;
vector near_pos;

dist = xyzdist(1,@P,near_prim,near_primuv);
near_pos = primuv(1, "P", near_prim, near_primuv);

int pnt = addpoint(0,near_pos);
int prim = addprim(0,"polyline");
addvertex(0,prim,@ptnum);
addvertex(0,prim,pnt);
The script will look up the closest primitive on the second stream –One of the guide curves. Then looks up the nearest position on this curve and creates a point to this position. After that, the script will create a primitive and connect the iterated point and the newly created point to the primitive. This will create hair that grows into the braid guide. This setup will work as is, but in my opinion, it makes the parting look too perfect and even.
I figured I could noise the guide curves to break up the parting line, but that would also affect the created hairs' tip position. I wanted the tips to end up right under the braid. To fix this issue, I separated the guide curve into two streams. I would noise one curve along the cross product vector of the normal vector transferred from the skin and the tangentu vector. The other curve I would leave as is. Plugging the noised curve on the second input and the regular curve on the third input and setting the xyzdist and primuv functions to look at different streams allows manipulation of the search for the closest primitive and nearest point position.
Updated script to create skin hairs:
float dist;
int near_prim;
vector near_primuv;
vector near_pos;

dist = xyzdist(1,@P,near_prim,near_primuv);
near_pos = primuv(2, "P", near_prim, near_primuv);

int pnt = addpoint(0,near_pos);
int prim = addprim(0,"polyline");
addvertex(0,prim,@ptnum);
addvertex(0,prim,pnt);
Script to create the cross product vector to use in the attribute noise:
vector n = normalize(v@N);
vector tan = normalize(v@tangentu);

vector cross = cross(n,tan);

v@cross = cross;

After this, the hairs need a resample, and they're ready for clumping, noises, etc. While setting noises to these hairs that are very close to the skin, I used this script once in a while to push the ingrown hairs back to the surface: Move Hairs Back To The Surface.
I built a simulation setup for this hairstyle to show that the groom would actually simulate and deform properly, and I'll share it in another post.