
Simple way to automate exports in Houdini with Python
Automating exports
Let’s say you have a setup that does something to your geometry and now you want to run this setup over multiple pieces of geometry. For small number of geometries it’s okay to do it manually but personally I always try to include as much automation as possible. Sometimes with heavy geometries it’s nice to automate the exports even with small quantities of exports, since it can take some time to cook each piece. Depending on the setups I would approach this in different ways, but this is one of my go-to methods and it’s quick to implement. For freelancers, if you work with heavy geometries, pair this with Send Email With Python and get yourself a nice coffee break. You’ll know when to come back to your workstation.
Switch node method
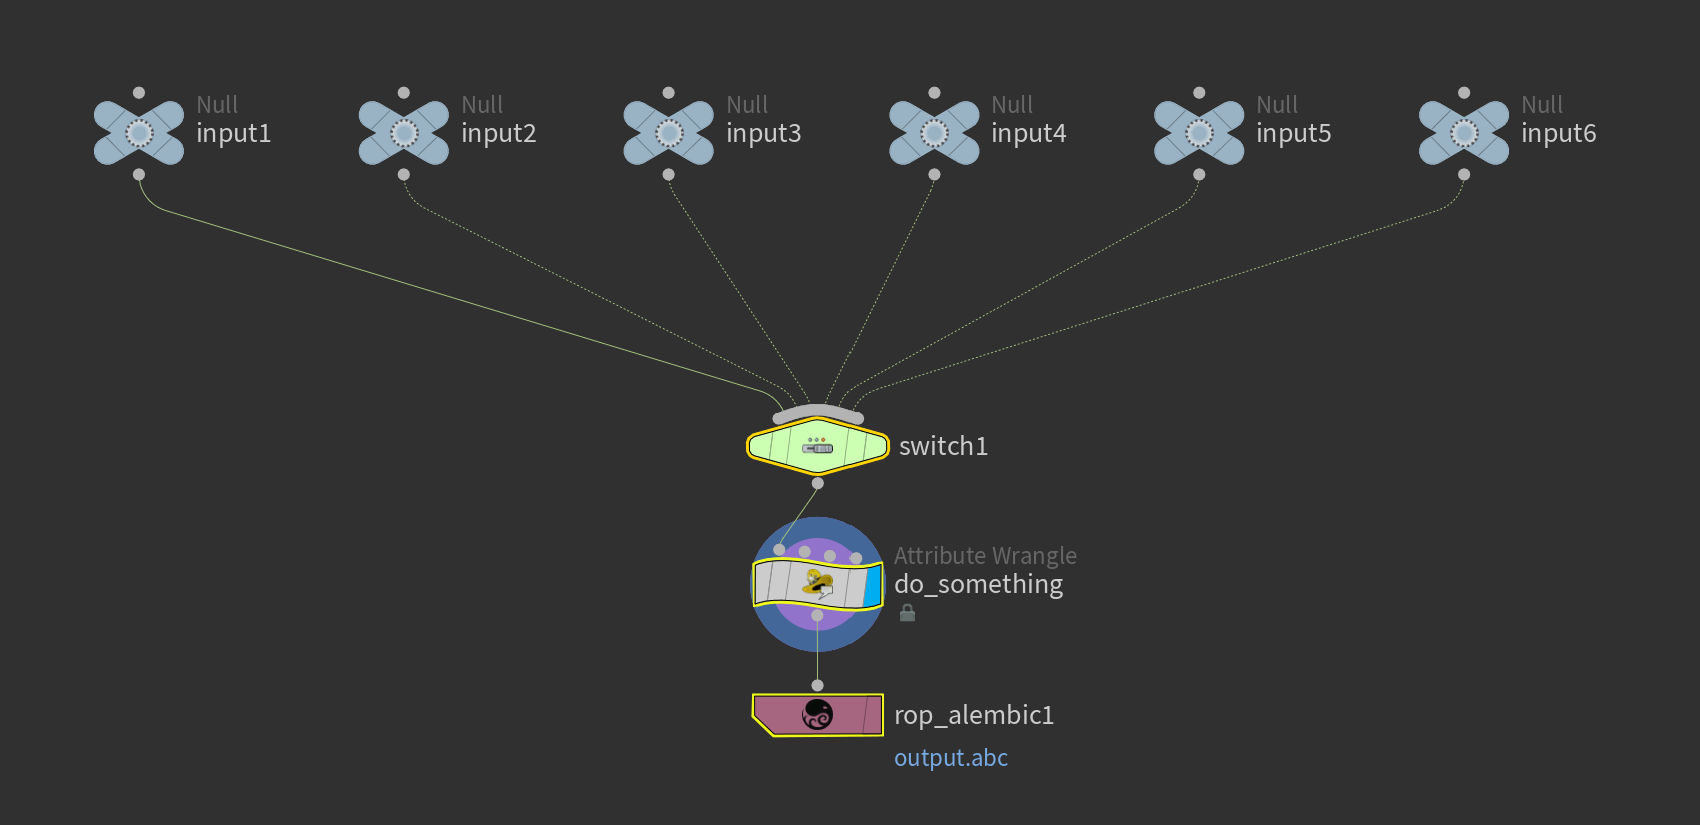
Step 1: Create a switch node
Create a switch node and wire it in the graph before the setup. Wire all the input geometries to the switch node.
Step 2: Create a rop alembic or rop geometry node
Create a rop alembic node or rop geometry node depending on what geometry type you want to export. I use alembics majority of the time. Wire the node after the graph.
Step 3: Open the python source editor
Open the ““Python Source Editor” from Windows -> Python Source Editor.

Step 4: Create a new python function
Let’s start writing the python function for looping through the inputs. The idea is to get the number of inputs to a variable and create a for loop that will execute a piece of code as many times as there is inputs. For each input the code will change the input parameter on the switch node, set the output path on the rop alembic node and press the “Save To Disk“ button.
To get started writing a new function type in: def export():
This is the way to get started on writing any python function in the hou.session module. You can create as many functions as you want in this module.

Step 5: Get number of inputs in the switch node to a variable
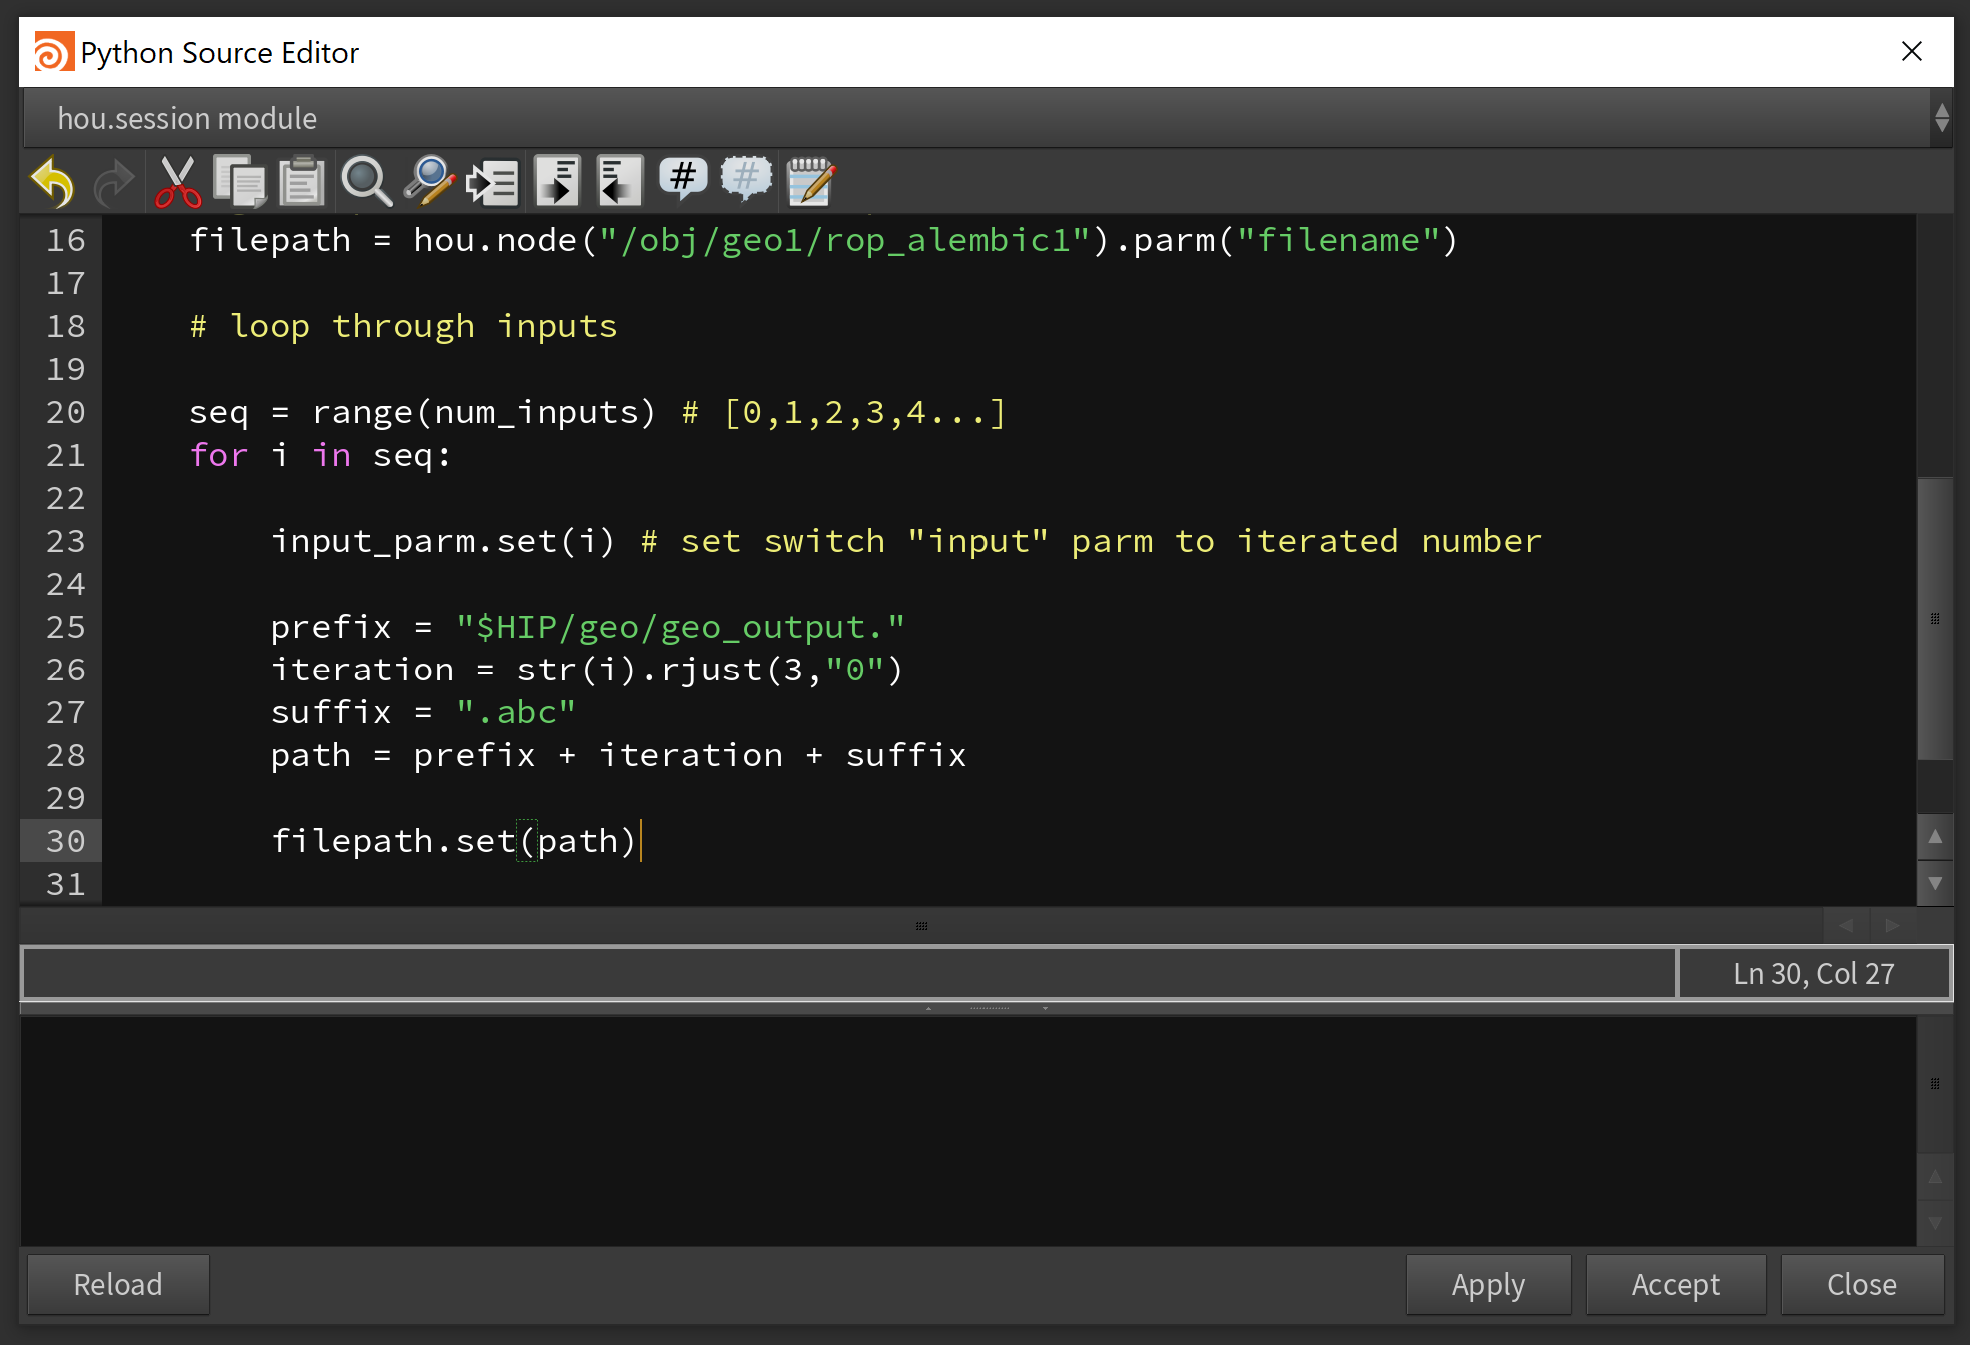
First variable we need for the for-loop is the number of inputs on the switch node. To get this parameter value into a variable we first need to call the node itself into a variable. Then the switch node inputs to a tuple. And lastly get the length of the tuple into a variable. The length of the tuple will be the number of members in the tuple. You can do all of this in the same line of code but I think it’s easier to understand it by writing it in a few different steps.

Step 6: Get switch node “input“ parameter to a variable
To change the input value on the switch node we need to call the parameter to a variable. Figuring out parameter names in Houdini is very simple. Just hover over the parameter name and the name will pop up. In this case the parameter name is “input“.

To then get this parameter into a variable:

Step 7: Get rop alembic file path to a variable
Same thing as the previous one. First call the node into a variable and then the node’s parameter into a variable. But this time I’m going to write it as a single line of code.

Step 8: Setting up the for-loop
The for-loop is a control structure in python that allows iterating over a code multiple times. The for-loop in python will iterate over members of a sequence (that is either a list, a tuple, a dictionary, a set, or a string). In this case we want to iterate over a sequence of numbers. Specifically, a sequence of numbers that has the length of the “num_inputs“ -variable and starts from 0. For example if the length of the variable “num_inputs“ would be 6, we need a sequence which is [0,1,2,3,4,5]. To create this sequence we can use the range() function. The range() function returns a sequence that has the length of the given argument. For example range(6) returns a sequence [0,1,2,3,4,5].
The for-loop itself consists of a loop variable and a sequence. For each iteration the for loop looks up the iterated member of the sequence and copies it to the loop variable. For example on the first iteration of a for-loop that loops over sequence [1,2,3,4] the loop variable will be set to 1. On the second iteration it will be set to 2 etc.
In this case we write the for-loop like so:

The for loop will loop over the sequence of numbers and copy the iterated member to the variable “i“ on each iteration. The lines to be looped over are indented. As you can see I took a head start and set the switch node “input“ parm to be set to the iterated number. Like this the the loop will change the input value on each iteration.
Step 9: Dynamic file path
For the for-loop to export different file on each iteration we need to configure a dynamic file path and set this to the “filepath“ variable. Setting up dynamic file paths is fairly straight forward, but we need to be careful when combining strings and integers. This is a basic example of a dynamic file path and depending on the setups you’re working with the file names need to be very specific. You can make this file path as complicated as you need by using more variables and adding these to the file path.
We can do the dynamic file path in a few different steps:
Create a prefix:
prefix = “$HIP/geo/geo_output.”
Create a unique iteration string for each iteration
iteration = str(i).rjust(3,”0”) #convert integer to string and add padding
Create a suffix
suffix = “.abc“
Combine to a single string
path = prefix + iteration + suffix
Finally let’s set this path to the “Alembic Path“ parameter of the rop alembic node
Step 10: Press the “Save To Disk“ Button
You can press any button in Houdini with python by calling the parameter name and using the pressButton() function. So let’s add this to the loop. Now the loop changes the switch node input parameter, creates dynamic file path, sets the file path on the rop alembic node, and press the “Save To Disk“ button.

Step 11: Use the function in python shell
At this point the function is working and we can use it in the python shell. When pressing either the apply or accept button, the function is stored in a hou.session module which is stored in the HIP file itself. To call this function, open the “python shell“ from windows -> python shell.
All you need to do is type:
hou.session.export()
Hit enter and the script will execute.
